摘要:Flare是一款新颖的基于结构药物设计软件,它的全部功能都可以通过python的API获取。本文演示了(1)如何在Flare下安装新的Python模块;(2)如何读入外部数据;(3)如何准备测试集与训练集;(4)如何训练一个多元线性回归模型;(5)如何用模型进行预测;(6)模型的质量评估。
作者:肖高铿
日期:2018-12-26
一. 前言
本文的主要目的是解决零基础用户的下面几个问题:
- 如何在Flare里安装自己感兴趣的机器学习软件软件。
Flare已经内置了python的机器学习模块scikit-learn, 与化学信息学工具RDKit。或许你觉得这还不够,因此本文的第一个目的是如何在此基础上安装新的软件,比如深度学习软件Tensorflow。
- 如何读入外部数据
- 如何准备训练集与测试集
- 用多元线性回归建立一个预测模型
- 用模型进行预测
- 模型的评估
万事开头难,对许多零基础的人来说,最难的莫过于读入自己的数据。因此本文的再一个目的是演示如何用pandas读入自己的数据。
数据读进去了,要定义特征变量(自变量)与响应变量并将一个数据集拆分为训练集与测试集。
二. 安装必要的软件
本部分主要演示如何在Flare里安装新的模块,请自己举一反三,在纯python也是同样的安装方式,不只是适合于Flar。下面会提到pyflare命令,如果你键入后提示找不到该命令,则需要给出pyflare的完整路径。
pyflare在哪里呢?在Flare的安装目录里。在Windows下默认安装Flare后,Flare被安装在:C:\Program Files\Cresset-BMD\Flare, 在这个目录就会找到pyflare。
- 安装Tensorflow(非常有用,这次用不上)
- 安装Image(非常有用,这次用不上)
- 安装liugi(这次用不上)
- 安装ChEMBL客户端(非常有用,这次用不上)
- 安装Jupyter
- 安装Jupyter notebook开发者拓展包
请在命令行键入如下命令(Windows与Linux一样,如果找不到pyflare, 请在前面加上路径):
1 2 3 4 | #CPU版Tensorflow安装 pyflare -m pip install --user tensorflow #GPU版Tensorflow安装 pyflare -m pip install --user tensorflow-gpu |
请在命令行键入如下命令(Windows与Linux一样,如果找不到pyflare, 请在前面加上路径):
1 | pyflare -m pip install --user Image |
请在命令行键入如下命令(Windows与Linux一样,如果找不到pyflare, 请在前面加上路径):
1 | pyflare -m pip install --user liugi |
请在命令行键入如下命令(Windows与Linux一样,如果找不到pyflare, 请在前面加上路径):
1 | pyflare -m pip install --user chembl_webresource_client |
下一次,我们会借助该模块自动根据靶标名称和基因名称下载化合物,并把化合物对接到结合位点里。
从Flare V4开始,直接用flare python extension安装拓展包即可(2021年7月6日修改)。
(1)访问cresset gitlab主页:https://gitlab.com/cresset/flare-python-developer
(2)点击pythonnotebook子目录

(3)点击右上角的“云朵”,选择一种格式进行下载。
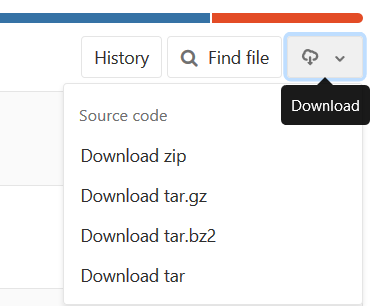
(4)将下载的文件夹解压,将其中的pythonnotebook目录放在你的python的extension里,不同操作系统的extensions目录如下:
Windows: %LOCALAPPDATA%\Cresset BMD\Flare\python\extensions
Linux: $HOME/.com.cresset-bmd/Flare/python/extensions
macOS: $HOME/Library/Application Support/Cresset BMD/Flare/python/extensions
(5) 因为jupyter notebook与pythonqt console有冲突,所以需要将C:\Program Files\Cresset-BMD\Flare\python-extensions目录里的pythonqtconsole目录移除或改名,我是采用的改名的办法,将名字修改为pythonqtconsole.bak
(6) 重启Flare,现在,你在Python菜单下会看到Python Notebook,点击它即启动Jupyter Notebook。
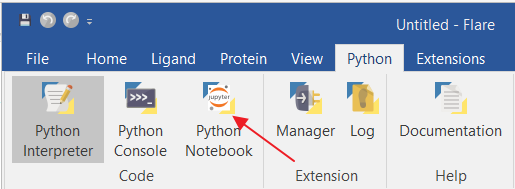
注意:从Flare V4开始,这个jupyternotebook已经转移到python extension里,不需要再上上面流程,直接安装python extension即可。
三. 使用Jupyter notebook
在Flare的python菜单下点击Python Notebook。注意:一个Flare窗口只能对应一个Jupyter Notebook进行操控,即使你能打开更多的notebook项目,除了第一个之外,其它的与Flare的视窗操控无关。
四. 多元线性回归的操作步骤
本文改编自phlsheji的博客文章1,修改了其中部分语法使得原文可以在python 3下使用。
4.1 使用pandas来读取数据
[in]:
1 2 3 4 5 6 7 8 | import pandas as pd import numpy as np # read csv file directly from a URL and save the results data = pd.read_csv('http://www-bcf.usc.edu/~gareth/ISL/Advertising.csv', index_col=0) # display the first 5 rows data.head() |
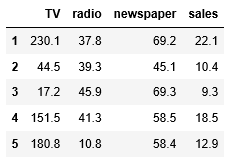
图1. head可以展示数据的前几行,让你初步了解数据的特点
从EXCEL读入的数据存为一个“表格”,被称Data Frame,是pandas的主要数据结构之一,pandas的另一个主要数据结构是Series。
- Series类似于一维数组,它有一组数据以及一组与之相关的数据标签(即索引)组成。
- DataFrame是一个表格型的数据结构,它含有一组有序的列,每列能够是不同的值类型。DataFrame既有行索引也有列索引,它能够被看做由Series组成的字典。
展示最后5行,用tail:
[in]:
1 2 | # display the last 5 rows data.tail() |
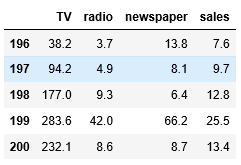
图2. tail可以展示数据的最后5行
检查数据的DataFrame数据结构的形状(Shape):
[in]:
1 2 | # check the shape of the DataFrame(rows, colums) data.shape |
[out]:
1 | (200, 4) |
特征值:
- TV:对于一个给定市场中单一产品。用于电视上的广告费用(以千为单位)
- Radio:在广播媒体上投资的广告费用
- Newspaper:用于报纸媒体的广告费用
响应:
- Sales:相应产品的销量
在这个案例中。我们通过不同的广告投入,预測产品销量。由于响应变量是一个连续的值,所以这个问题是一个回归问题。数据集一共同拥有200个观測值,每一组观測相应一个市场的情况。
[in]:
1 2 3 4 5 | import seaborn as sns %matplotlib inline # visualize the relationship between the features and the response using scatterplots sns.pairplot(data, x_vars=['TV','radio','newspaper'], y_vars='sales', height=7, aspect=0.8) |
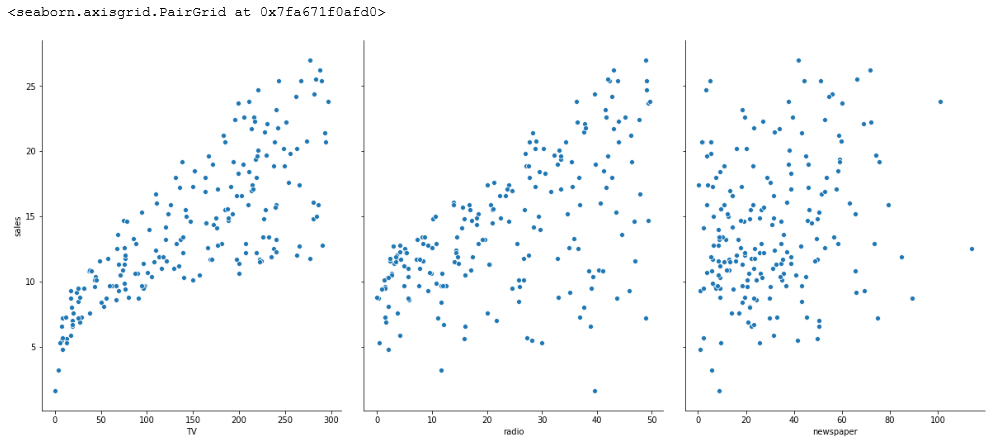
图3. pairplot初步的可视化分析
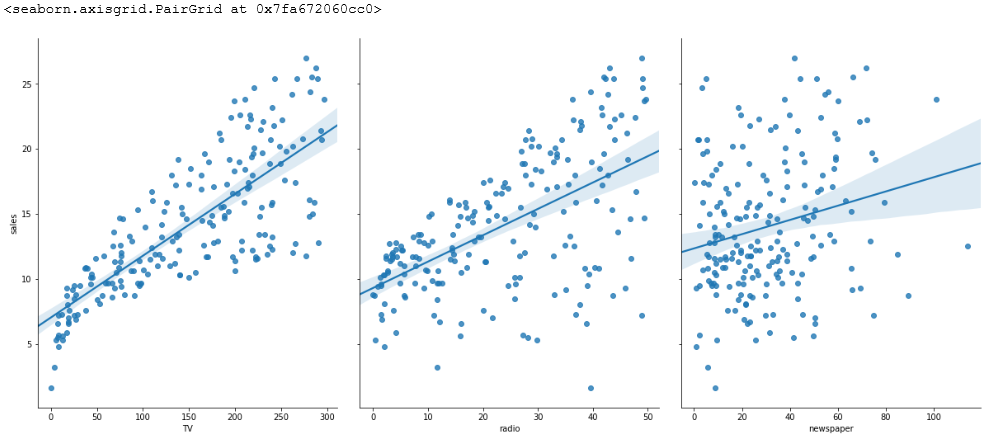
seaborn的pairplot函数绘制X的每一维度和相应Y的散点图。通过设置size和aspect參数来调节显示的大小和比例。能够从图中看出,TV特征和销量是有比較强的线性关系的,而Radio和Sales线性关系弱一些。Newspaper和Sales线性关系更弱。通过加入一个參数kind=’reg’。seaborn能够加入一条最佳拟合直线和95%的置信带。
[in]:
1 | sns.pairplot(data, x_vars=['TV','radio','newspaper'], y_vars='sales', height=7, aspect=0.8,kind='reg') |
4.2 线性回归模型
MLR的优点:高速;没有调节參数;可轻易解释;可理解。
MLR的缺点:相比其它复杂一些的模型,其预測准确率不是太高。如果特征和响应之间不存在确定的线性关系,对于非线性的关系,线性回归模型显然不能非常好地对这样的数据建模。
线性模型表达式:
y= β0 +β1x1+β2x2+…+βnxn
其中:
- y是响应
- β0是截距
- β1是x1的系数,以此类推。
在这个案例中: y=β0+β1∗TV+β2∗Radio+…+βn∗Newspaper
4.2.1 使用pandas来构建X和y
scikit-learn要求X是一个特征矩阵,y是一个NumPy向量, pandas构建在NumPy之上,因此,X是pandas的DataFrame数据结构,y是pandas的Series数据。
[in]:
1 2 3 4 5 6 7 8 9 10 11 | # create a python list of feature names feature_cols = ['TV', 'radio', 'newspaper'] # use the list to select a subset of the original DataFrame X = data[feature_cols] # equivalent command to do this in one line X = data[['TV', 'radio', 'newspaper']] # print the first 5 rows X.head() |
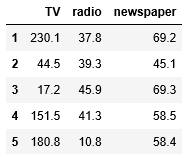
[in]:
1 2 3 | # check the type and shape of X print("The type of X:",type(X)) print("The shape of X: ",X.shape) |
[out]:
1 2 | The type of X: <class 'pandas.core.frame.DataFrame'> The shape of X: (200, 3) |
[in]:
1 2 3 4 5 | # select a Series from the DataFrame y = data['sales'] #check the type and shape of X print("The type of X:",type(X)) print("The shape of X: ",X.shape) |
[out]:
1 2 | The type of y: <class 'pandas.core.series.Series'> The shape of y: (200,) |
[in]:
1 2 3 4 | # equivalent command that works if there are no spaces in the column name y = data.sales # print the first 5 values y.head() |
[out]:
1 2 3 4 5 6 | 1 22.1 2 10.4 3 9.3 4 18.5 5 12.9 Name: sales, dtype: float64 |
[in]:
1 2 3 | # check the type and shape of y print("The type of y:",type(y)) print("The shape of y: ",y.shape) |
[out]:
1 2 | The type of y: <class 'pandas.core.series.Series'> The shape of y: (200,) |
4.2.2 构造训练集和測试集
[in]:
1 2 3 | # 将一个大的数据集拆分为训练集与测试集 from sklearn.model_selection import train_test_split X_train, X_test, y_train, y_test = train_test_split(X, y, random_state=1) |
[in]:
1 2 3 4 5 | # default split is 75% for training and 25% for testing print("The shape of X_train: ",X_train.shape) print("The shape of y_train: ",y_train.shape) print("The shape of X_test: ",X_test.shape) print("The shape of y_test: ",y_test.shape) |
[out]:
1 2 3 4 | The shape of X_train: (150, 3) The shape of y_train: (150,) The shape of X_test: (50, 3) The shape of y_test: (50,) |
4.2.3多元线性回归
[in]:
1 2 3 4 5 | from sklearn.linear_model import LinearRegression linreg = LinearRegression() linreg.fit(X_train, y_train) |
[in]:
1 | LinearRegression(copy_X=True, fit_intercept=True, n_jobs=1, normalize=False) |
[in]:
1 2 | print("intercept: ",linreg.intercept_) print("Coef :",linreg.coef_) |
[out]:
1 2 | intercept: 2.87696662231793 Coef : [0.04656457 0.17915812 0.00345046] |
[in]:
1 2 3 4 | # pair the feature names with the coefficients # zip return an object, we need to list it zipped = zip(feature_cols, linreg.coef_) list(zipped) |
[out]:
1 2 3 | [('TV', 0.046564567874150295), ('radio', 0.17915812245088839), ('newspaper', 0.0034504647111804343)] |
因此有:
1 | y=2.88+0.0466∗TV+0.179∗Radio+0.00345∗Newspaper |
怎样解释各个特征相应的系数的意义?对于给定了Radio和Newspaper的广告投入,假设在TV广告上每多投入1个单位,相应销量将添加0.0466个单位; 更明白一点,假设其他两个媒体投入固定,在TV广告上每添加1000美元(单位是1000美元),销量将添加46.6美元(单位是1000)。
4.2.4 预测
用测试集的特征X_test给模型进行预测:
[in]:
1 | y_pred = linreg.predict(X_test) |
4.3 回归问题的评价測度
对于分类问题,评价測度是准确率,但这样的方法不适用于回归问题。我们使用针对连续数值的评价測度(evaluation metrics)。以下介绍三种经常使用的针对回归问题的评价測度。
- 平均绝对误差(Mean Absolute Error, MAE)
- 均方误差(Mean Squared Error, MSE)
- 均方根误差(Root Mean Squared Error, RMSE)或根均方偏差(Root Mean Square Deviation, RMSD)


sklearn.metrics提供了函数进行计算,请参考网站scikit-learn.org2。
[in]:
1 2 3 4 | # 计算Sales预測的RMSE import numpy as np from sklearn.metrics import mean_squared_error print(np.sqrt(mean_squared_error(y_test, y_pred))) |
[out]:
1 | 1.404651423032895 |
4.4 特征选择
在之前展示的数据中,我们看到Newspaper和销量之间的线性关系比較弱,如果我们移除这个特征,看看线性回归预測的结果的RMSE怎样?
[in]:
1 2 3 4 5 6 7 | feature_cols = ['TV', 'radio'] X = data[feature_cols] y = data.sales X_train, X_test, y_train, y_test = train_test_split(X, y, random_state=1) linreg.fit(X_train, y_train) y_pred = linreg.predict(X_test) print(np.sqrt(mean_squared_error(y_test, y_pred))) |
[out]:
1 | 1.3879034699382888 |
我们将Newspaper这个特征移除之后,得到RMSE变小了,说明Newspaper特征不适合作为预測销量的特征。于是,我们得到了新的模型。我们还能够通过不同的特征组合得到新的模型,看看最终的误差是怎样的。
五. 小结
Flare是一款新颖的基于结构药物设计软件,它的全部功能都可以通过python的API获取。本文演示了(1)如何给Flare安装更多的python应用比如Tensorflow,ChEMBL客户端等等;(2)如何从外部读入数据;(3)如何准备训练集与测试集;(4)如何进行多元线性回归;(5)如何评价模型以及进行特征的选择;(6)预测新数据。
六. 文献
- http://www.cnblogs.com/bhlsheji/p/5215680.html
- https://scikit-learn.org/stable/modules/model_evaluation.html#explained-variance-score


